Science
Frogs and Toads Together: Why do Amphibians Group Up?April 11, 2025


Outdoor learning equipment for schools and homeschool groups come in all different shapes, sizes, and prices. But as a teacher, you are already paying for way too many things to make your indoor classroom run, you shouldn’t have to add more of a financial burden onto your shoulders to be able to add outdoor education into your teaching methodologies. I have good news for you! There are cheap ways to get some equipment and props that are versatile and can be used in lesson after lesson.
Make sure to tune into this episode where I cover materials that are helpful for games and role playing like poker chips which are loose parts that can become animal food, gas molecules, pollen particles, and more. I also share about collection materials because you know your kiddos are gonna want to collect. I also hit on the power of field guides, a way to bring informational text outside. With each of these categories I make sure to give you some ideas for free or very cheap options in lieu of buying brand new.
I also cover three different methods to help you store these materials so that you don’t clutter up your indoor space in an effort to enhance your outdoor learning. With the holidays right around the corner, consider adding some of these materials to your class wish list and help your students’ caregivers give back to their students’ education.
Don’t feel like you need to acquire everything on this list at one time. Get creative and find cheap or free ways to supply helpful materials for your outdoor education.

Teaching science in elementary school is crucial for nurturing young minds. But as educators, finding the time and resources to create engaging lessons can be a challenge. That's where this podcast comes in.
Welcome to Naturally Teaching Elementary Science, the show dedicated to supporting elementary teachers in their quest to bring authentic and place-based science experiences to their classroom. I'm Victoria Zablocki, a certified elementary teacher turned outdoor educator. With over a decade of experience coaching teachers on effective science teaching methods, I'm passionate about making science accessible, understandable, and fun for educators and students alike.
Join me as we explore strategies for teaching science in elementary school with practical teaching tips, insightful interviews, picture book reviews, and more. Whether you've taught for a long time or just started your teaching journey, this podcast is your trusty resource for enhancing your science curriculum. So let's grow together.
Hey everybody, welcome back to the Naturally Teaching Elementary Science podcast. My name is Victoria Zablocki and I'm your host. So it's officially the week of Thanksgiving, so we're going to do a short but sweet episode today.
Something that I haven't talked about yet with teaching in nature is the equipment. Do you really need to buy extra stuff to make it work? Teachers already have too much of a burden on their shoulders to supply learning materials and equipment for their classrooms.
I don't want adding outdoor education to your educational practices to be a financial burden for you as well. So I want to reassure you that you can teach outside without any special kind of outdoor learning equipment. You already have all the tools that you need from your experience inside, you're just taking it outside.
That being said, are there things that could make teaching outside easier? Yes, of course, and a lot of those things, you can find at garage sales, or you could acquire through donations from caregivers or local businesses, making it less of a financial burden on you. So in this episode, I'm going to break down some of my favorite outdoor learning equipment in case you want to add them to your class wish list for caregivers to consider this gifting season, because we know many of our caregivers, parents, grandparents, foster parents, they want to help give back to the classroom.
And this is a way for them to enhance their students' learning experiences, and also show appreciation to you for everything that you do for their students.
[2:30]
So the first category of material that I want to talk about are game materials. So playing learning games outside will help your students better understand your material, and sometimes those games will take props.
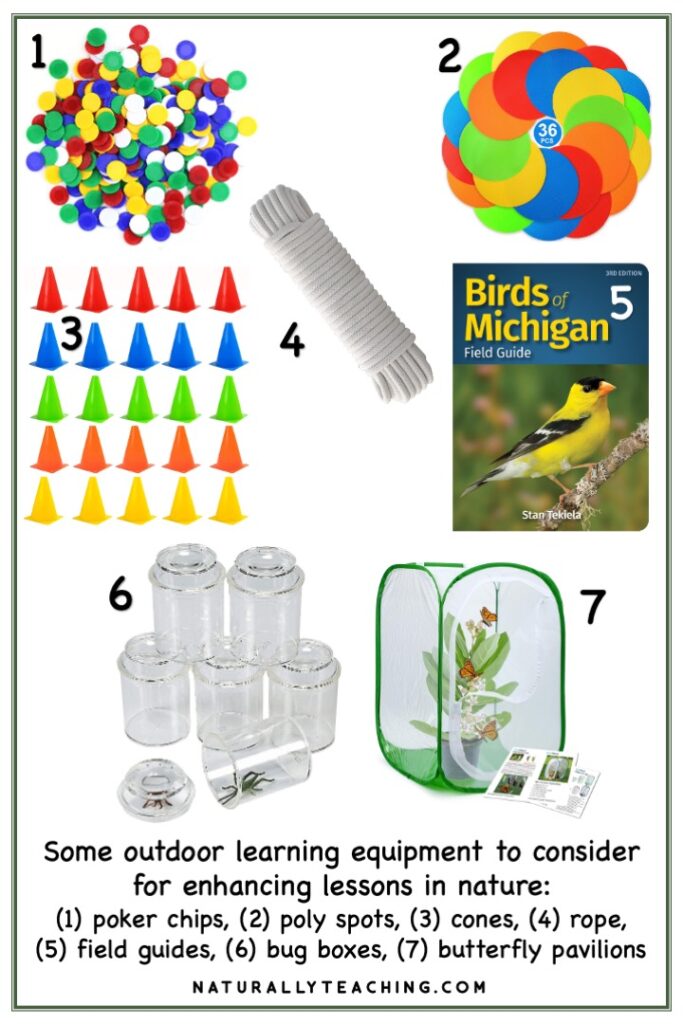
So some reusable and transformative props include poker chips, ropes, cones, and polyspots. So poker chips are great loose parts that could become food for hungry animals, data collection tools, pollen from flowers, and many, many more things. It's nice to have multiple colors in case you need to designate different aspects of learning through the different color chips.
And if you've listened to other episodes, you've heard me talk about using green poker chips for chlorophyll, white poker chips for oxygen, blue for water, that sort of thing. I've come across poker chips at the Dollar Tree for $1.25 for 100. They're very affordable and they're easy for caregivers to get their hands on.
So this is a very easy thing to add to your holiday gift guide if you happen to make one for your caregivers. Ropes and cones are helpful for identifying boundaries. So ropes are nice and light and provide a nice defining boundary that can extend for a very long distance.
Cones are tall and can help define boundaries with a quick glance. So it's nice to have different colors for the cones especially, because that can help define different boundaries for different teams. But if you combine ropes with cones, you're gonna get the best of both worlds, because the cones are tall and can be seen from far away, while the ropes can extend the entire length of your boundaries.
Again, super easy to find at a local dollar store and very affordable. Polyspots are great for defining individual spots for students or for creating obstacles in an obstacle course. And it's nice to have these in different colors as well, just in case your game calls for different colored teams, or you wanna designate green for grass, blue for water again.
These items tend to be heavy, so having them in a specific backpack or in your wagon may be the best way to transport them. And they're also a bit more expensive, but once you do acquire them, however you acquire them, you'll wonder how you got along without them. They're very versatile, which is helpful.
As some very cheap alternatives, I've seen teachers collect milk jug lids to use in place of poker chips. I've seen tall jugs filled with sand to be used instead of cones. I've personally used paper plates instead of polyspots. So you can get creative and find ways to save yourself some cash while also getting the benefits of these game materials for your class.
[5:04]
The second type of material I wanna talk about are collection materials. So specifically, bug boxes and butterfly pavilions. Although these tools are labeled as being bug and butterfly specific, these exploration tools are helpful not just for invertebrates, but also for collecting a variety of items from nature.
So I've used bug boxes to collect different levels of the food chain, living and non-living things, different colored things, and so many other ways. Some bug jars tend to be sturdier than others, and some of them have magnifying glasses on the top, which is helpful.
And then some of them can be kind of fragile. So you want to make sure you read reviews before you suggest any of these bug boxes for your caregivers to donate to the classrooms. And another point to note is if you do acquire bug boxes and they have a lid and a bottom, have your students carry one in each hand while they're outside collecting, unless their box is closed and that'll help make sure that you don't lose a lid or lose a bottom.
That happens quite a bit. So trying to help them keep track or maybe putting a piece of tape that covers the side of a top and a bottom so then they're stuck together, but they can still be flipped open.
It's very easy for those pieces to get lost, so try to maintain the integrity of your collection materials by having a system that keeps the two together. A good butterfly pavilion is nice for flying insects, but it can also be helpful for imaginative play or collection of soft natural items. So things like seeds or leaves or grasses, if you put anything really heavy or sharp in there, it's probably going to ruin the netting and that'll be a really big bummer.
So soft natural materials. They tend to be collapsible and easy to transport for outdoor exploration, which is great. And some of them have side doors, which is nice.
It makes it easy to open. And then some have that round, very thick wire that helps keep the top and the bottom open in a circle. However, I've noticed over a couple of years of use that that wire ends up poking through, so I would suggest using more of the laundry basket looking size and shape versus the large cylindrical butterfly pavilion.
As a cheap alternative to these options, you could get a bunch of reusable plastic containers from a thrift shop, a dollar store, a garage sale, what have you, and poke holes in the tops for the animals to breathe and call it good. Plastic containers can work pretty well if you're working with a small budget. And I'm going to make sure to put links in the show notes for a lot of these items that I'm suggesting.
I'm not saying that those are the perfect ones, but they're just a good example so that you can have a visual to see what I'm talking about as far as the materials that I've used in the past successfully.
[7:53]
The third item that I would suggest if you're looking to enhance your outdoor learning equipment would be field guides. So believe it or not, many children get into identifying what they're finding when they're outside exploring.
Field guides are such a helpful tool for your inquisitive learners that want a name for everything. These books can add up pretty quickly though, so check your scholastic catalogs to see if they have any cheaper prices or see if there's a local bookstore that's willing to donate a handful. You really don't need one per student.
You can get away with five, maybe six of like a bird field guide or a state field guide, what have you. Alternatively, a cheap suggestion would be to work with your students to create your own field guide on the computer and then make field binders that you can take outside. Also, if you have access to an iPad or you have the okay from the administration in your building to use your phone, you could download the free app Seek by iNaturalist to help you identify what you're finding with your students.
[8:56]
Now that we've talked through different materials that will help your nature lessons, we should talk about storage because that can make a huge difference. So even though having the materials and props to assist in your outdoor lessons will be a huge blessing, you have to consider that it also adds to the amount of stuff you have in your classroom. So here are some suggestions on how to keep things organized and easy to use.
First method is to put each type of material or prop in their own gallon sized bag and store them in a large tote or on a shelf in your closet. The bag method makes it easy for your materials to fit in your backpack and for easier transport for your lessons. So you just grab it, throw it in your backpack, and go.
The second method is to put each type of material or prop in a shoe box sized tote. These stack really nicely on shelves or on a cupboard in your classroom, and that makes it easy to see everything that you have all at one glance. They are a little bit trickier to squeeze into a backpack, but if you only need one or two totes at a time, then they should be able to fit okay.
The third option would be the catch all. So if you invest in a foldable or metal wagon to help you transport your learning equipment, consider storing your materials and props in that wagon so that you always have them when you need them. This isn't the most optimal option if you don't have space to store your wagon that's outside your classroom, but it makes the grab and go method of lesson planning a lot easier.
[10:21]
So I want to end with a teaching tip. So when it comes to acquiring equipment for your outdoor learning experiences, start small. You don't need it all and you don't need it right away.
Start with things that are very versatile and can help you with more than just one lesson, like those poker chips. Easy to come by, cheap, and you can use them for a thousand different types of lessons, right? Instead of investing in 3D models of the monarch life cycle, instead you could use that money to get the poker chips, the ropes, the cones, the things that you need that you can use in multiple different ways, right?
The life cycle of the monarch butterfly is super cool, and it's great for them to have right in front of them, but it can only be used a couple of different ways. Also, like I said before, think creatively and find free or super cheap options until you can save up, find a grant, or get donations to acquire more equipment. Milk jug lids are perfect.
They work almost as well as poker chips. The only thing that makes it challenging is they hold on to water a little bit more, and you have to make sure they dry out before you put them away. Aside from that, they're almost the same as poker chips, but super easy to acquire. So try to be creative and find ways to stretch your dollars, because I know you're already stressed, and you already have so much to buy for your classroom. Let's not add to that stress.
[11:44]
So in a nutshell, we talked about different outdoor learning equipment for schools and homeschool groups. We hit on game materials like poker chips, ropes, polyspots, and cones. We talked about collecting materials like bug boxes and butterfly pavilions. And we also talked about field guides as a way to be able to help your students identify what they're finding outside.
Then we ended with how we could organize these materials that we acquire, including putting them into bags, putting them into small totes, and then putting them into some sort of receptacle that can go out with us. So thanks for taking time to listen today. I know you're busy, and I truly appreciate the time that you take to tune in.
If you have any questions, wonderings, or outdoor learning equipment that you use, get a hold of me on Instagram at naturally.teaching, or you can email me at victoria@naturallyteaching.com. And don't forget to check out the show notes for this episode at naturallyteaching.com/episode28, where I will have all the links from different examples of the items that we talked about. So thanks again for joining me today.
And until next time, keep exploring, keep learning, and keep naturally teaching.
Thank you so much for tuning in to today's episode of the Naturally Teaching Elementary Science podcast. I hope you found it informative, inspiring, and full of actionable insights to enhance your science teaching journey. Connect with me on social media for more updates, science tidbits, and additional resources.
You can find me on Instagram and Facebook at naturally.teaching. Let's continue the conversation and share our passion for elementary science education together. Don't forget to visit my website at naturallyteaching.com for all the show notes from today's episode.
If you enjoyed today's episode, please consider leaving a review on your favorite podcast platform. Your feedback helps me improve and reach more educators just like you. Thank you again for listening, and until next time, keep exploring, keep learning, and keep naturally teaching.


0